Friday, December 23, 2011

Point in Plane (finally)

One of the last things I've been stuck on is figuring out if a point is within a plane in. After playing around with nearestPointInMesh a couple days ago, it seemed that the function was designed to determine if a point was inside a 3-dimensional mesh rather than a 2D plan (though I still consider that a mesh), which let to a few days of frustration and misunderstanding.

I ended up coming across Jeren Chen's code on determining if a point is inside a mesh without using plug-ins (which I really prefer since you shouldn't assume your user has all the plug-ins you do). His code, like the Maya plug-in, functioned on a 3D mesh rather than a 2D plane, but I ended up writing a hacky function that takes in a plane, moves it down the y axis a tiny bit and extrudes it upwards twice that amount to form a "buffer" 3d mesh for that plane. And then I called Jeren's code. For those wondering it looks like this:
def pointInPlane(v, p):
    # convert point to MPoint
    m = MPoint()
    coord = cmds.xform(v, q = True, ws = True, t = True)
    m.x = float(coord[0])
    m.y = float(coord[1])
    m.z = float(coord[2])
   
    # copy the given plane (since we'll be extruding it and deleting afterwards)
    plane = cmds.duplicate(p)
   
    # select all faces on the plane
    cmds.select(plane, r=True)
    cmds.ConvertSelectionToFaces()
    f = cmds.ls(sl=True)

    # move plane down a bit and extrude upwards to form a thin "buffer" mesh for the pointInMesh function
    cmds.move(0, -0.05, 0, plane, a=True)
    e = cmds.polyExtrudeFacet(ty=0.1)
   
    # get the resulting polygon
    poly = getPolyFromFace(f)
   
    # call pointInMesh function
    inside = isInside(m,poly)
   
    # delete the copied poly
    cmds.delete(plane)
   
    return inside

Hacky as it is, it works (yay!)

Thursday, December 22, 2011

Bug Fix + Self Note

I found out that running my code on a computer that wasn't my laptop would result in the trees not being able to load, since in my code I had specified them via an absolute file path. Just fixed that by making a new function that would find the current file path via python's os module, and navigate into the assets folder. Just as a self-reminder, the command to find the path of the script that's running is:

return os.path.abspath( __file__ )

Friday, December 16, 2011

Making the GUI

Most of the GUI has been implemented! Right now the GUI is separated into 3 tabs, with the first one controlling all map-related functions (such as subdivision), the second one controlling all building-generating parameters, and the third one displaying a map of color to asset name (still in progress). As of now I'm able to generate buildings via the GUI.


Thinking about also including a color editor in the GUI so the user doesn't have to navigate to Maya's Color Set Editor to change the faces.

Also, I'm still working on figuring out if a point falls within a plane. Joe suggested I use the closestPointOnSurface command, but that seems to be a plug-in that happens to be missing from my version of Maya, and I can't find a download for it at the moment. I have, however, found a nearestPointOnMesh command in my plug-in directory, so I'll be looking into that tomorrow.

Monday, December 12, 2011

I heard you like faces, so I put a face in your face...

Working on implementing subdivisions right now. One thing I've come to notice is that depending on how the face is generated (ie. via the interactive split tool or cut faces tool), running the same subdivide command can generate different results.

For example, in the instance below, I'm trying to add split each face into 4 sections in the u-direction. Some faces split fine, others aren't affected at all.

Direction-specific splitting. Some faces unchanged.

One solution I've found is to split each face recursively*, rather than in a particular direction. Though this offers slightly less control over how the faces are split, it does manage to affect every face.

*With divisions set to 3 in quad mode, each initial quadrilateral will be recursively subdivided into 4 subfaces 3 times, yielding a total of 4 * 4 * 4 = 64 faces.

Recursive splitting. All faces modified.

While it is possible to implement directional subdivision, it would require the user to refrain from using certain tools in generating the map. Between the two choices, I decided in favor giving the user the more freedom while retaining basic functionality.

Sunday, December 4, 2011

Self Evaluation

It's time for some introspective self-evaluation.

Looking back on my initial proposal, I realized that starting out, my goals weren't very clear. There are two types of procedural generation when creating a city—the generation of the individual building, and the generation of the whole city from many buildings. At first I had planned to tackle both these problems, but combined with a rather steep learning curve for MEL, this proved to be a bit too ambitious. It's fair to say that I underestimated how long it would take to really understand how MEL worked and how to manipulate objects through MEL effectively. After getting feedback from my Alpha Review, I stepped back and reevaluated my project. This led to a change in direction that I feel was ultimately a positive turn for my project. I decided to focus on the generation of a whole city, since it allowed for more artistic experimentation (generating the different building types), as well as a more practical final product.

While my current project is fairly different than what I had originally envisioned, I'm quite happy at how it turned out. Here is a list of features I have today:

  • Ability to generate buildings from either faces or polygons
  • Established framework for adding additional types of buildings
  • Generation of different building types depending on face color
  • 3 different types of assets: residential, business, trees
  • Ability to import additional assets as Maya ASCII files
  • Setting max/min height of generated buildings (currently hard-coded)
  • Setting cell width of building windows (currently hard-coded)
  • Generation of random types of roots/details on buildings

    Please see my previous post for features I'm planning on implementing the next few weeks. Eventually I'm hoping to create a script that's easily extensible so users can have more control over what types of assets are generated (ie. a backyard with different types of plants instead of being limited to a city)

    Beta Review and Future Plans

    I had my Beta Review with Norm and Joe on Friday, and I'd say it went over pretty well. I implemented Norm's suggestion on color-coding building footprints to determine the generated structure type, as well as importing external Maya ASCII files into the library of available assets. Results-wise, I was able to generate a city with multiple building types as well as trees (imported Maya ASCII files), which I was pretty happy about.


    The Beta Review also gave me some ideas to work on the next few weeks. One was finding a rectangle that can fit completely within a convex polygon. Prior to this, I was generating each footprint by shrinking the bounding box of its containing face by a random value, but in some cases (such as when the polygon is a triangle), the resulting footprint can still fall outside of the face. Another feature we thought of during the review was to subdivide a face into smaller components so the user can generate multiple smaller assets close together.

    With the end of the semester coming close, here is a list of features I'm working on having done in the next few weeks:


    Must
    • Generate a GUI for the users
    • Implement rectangle generation within convex polygon feature
    • Implement face subdivision
    • Refine building structures
    Optional
    • Implement user import of assets (as part of the GUI)
    • Add additional building types

      Dec 4 - 10
      • Implement rectangle in convex polygon
      • Implement face subdivision

      Dec 11-17
      • Refine building structures
      • Create GUI

      Dec 17-21
      • Finish optional implementations if time permits
      • Movie presentation

      Tuesday, November 29, 2011

      We're in Business!

      Added a new business building type. Still have to refine the structure. Also added user control over what types of building to generate on a face (video will be up after beta review). My beta review got delayed, so I'm hoping to stick in a few more building types by then.

      Sunday, November 27, 2011

      Roofs


      Added ~5 roof variations. Need to fix footprint generation when the given lots aren't rectangular, which is a maximal rectangle problem. Here's to hoping Maya has some kind of function for that.

      Saturday, November 26, 2011

      Mini-City!


      Some updates for the week:

      • Implemented functionality to generate buildings given either a selected face, multiple selected faces, a one-faced polygon, or a multiple-faced polygon. This will offer a lot of flexibility for the user when they are selecting regions to generate buildings
      • Fixed window extrusions
      • Altered a big chunk of my original framework for floor-generation. Before, my code would generate one floor, and return the top-most face. The subsequent function would take that face, duplicate it as a transform node, and extrude from that. The problem I ran into with this method was that, in cases where I subdivided the side faces for making windows, the resulting face that I returned would have all the excess vertices on its sides (imagine a square with a vertex for each corner, and then ten more vertices spaced evenly on each side). This was undesirable, since my code assumes that the footprints passed in are "clean" (as in, without necessary subdivisions). I fixed this by making each function duplicate the resulting face as a polygon/transform node (using a helper function I wrote). This way I can create a duplicate footprint before adding windows to the original one.
      • Figured out how to import Maya ASCII files into a scene in python. I'm planning on letting users import their own assets eventually
      • Improved the building-generation flow in the code. The code stores all the faces in a list (if there are multiple faces to work on). For each face, the ground floor is generated first, and the rest of the floors are generated in a for-loop. Each level is split into two additional functions-- createLedge and createFloor.
      Some things I'm hoping to finish before the beta review are:
      • Port over the GUI code (right now all the values in Python are hardcoded; the GUI is still in MEL)
      • Create functions for roof-generation
      • Create generation functions for different building types
      • Start functionality for reading in an image file and mapping it to cells on an input map
      • Add more variation

      Monday, November 21, 2011

      Making Windows

      Spent the weekend fixing the the conflict between column generation and building base extrusion. I ended up keeping the initial footprint as a polygon with no subdivisions and creating the columns and base as such:

      1. inwardExtrude to create the actual footprint the building will be generated from (this is to give "sidewalk space")
      2. Add subdivisions to the newly created footprint. Right now it's set to 10x10, but in the future this value can be pulled from the GUI
      3. Select the outer ring of faces for column generation.
      4. ShrinkPolygonSelection (this command took a while to find) to select the inner cluster of faces. I wrote a helper function called deleteSubdivisions to remove the subdivisions for the building base extrusion. The reason for removing subdivisions is keep each wall face clean, so there are no conflicts when I do need to subdivide each face according to how many windows there should be.
      5. Finally we can extrude the building body to the height of the columns to get something like this:

      Moving on to the floor generation, the hardest part was to figure out how to select the faces I needed, and how to subdivide each face properly. I actually started this portion earlier this week, except the lack of documentation for polySubdivideFacet led me to believe that it wasn't possible to subdivide in only one direction (ie vertically). Coupled with the fact that maya commands in the actual interface are named differently than the ones in the documentation, I was running around in circles for a few days before figuring out that you actually can subdivide a face in one direction (I ended up trying the Add Divisions tool in maya and realizing it was indeed calling polySubdivideFacet).

      That being done, the next step was to scale/extrude each cell to form the frame of a window. From looking through a bunch of other people's code, I learned that polySelectConstraint was the best way to isolate the faces I wanted (ie. all faces on the east side of the building). That being said, I ran into a bug stemming from the fact that I was running transformations on faces that were passed in. I hadn't anticipated the fact that when you iterate through each side face of a floor and subdivide it, you end up with more faces than you started with and trying to keep track of everything by explicitly naming faces becomes much more difficult. So somehow I ended up with this:

      Lots and lots of windows
      I'm pretty sure I know what needs to be fixed, so this should be good to go by tomorrow. The windows were the last step to the floor creation function, so once that's done I should be able to create a building by calling createFloor numFloor-many times.

      Some takeaways:

      I feel that the majority of my time up until now has been spent on overcoming the rather steep learning-curve of knowing which maya commands to use to do what you want. I've also become more aware the the flexibility we can get by switching between vertex, edge, and face perspectives (a lot of the helper methods I wrote this weekend utilized this). Previously I was a bit hesitant to post pictures, since I felt what I had was rather lacking given the time that had passed. However I've realized the ramp-up time I took was worth it, since I feel a lot more comfortable coding for maya now, and my productivity has gone up quite a bit.

      Just for my own reference (in case all 300 of my tabs crash), here are the Maya commands I find myself using the most:

      polyEval
      polyExtrudeFacet
      polyCreateFacet
      polySubdivideFacet
      xform
      polyListComponentConversion (or just cmds.ConvertSelectionToFaces())
      polySelectConstraint
      polyChipOff
      polySeparate

      Friday, November 18, 2011

      Adding Details

      Most of this week was spent on looking through sample scripts to see what command patterns other people use to generate building details. One thing I've realized is that although I'm fairly comfortable with MEL and python commands in Maya at this point, I still lack a lot of the experience that comes from long-term use of the languages. The most difficult part for me is knowing what commands I should use for a particular task. For example, the code I had before the alpha review had attempted to move the pivot of a model by using the move command in MEL. Now I know the the proper way to go about it is to use the xform command instead, since there is a scalePivot flag specifically for this operation. The python function I wrote for this looks like :

      def movePivotToBottom(obj):
          piv = cmds.xform(obj, q=1, ws=1, scalePivot=1)
          newY = cmds.getAttr(obj + '.boundingBoxMinY')
          piv[1] = newY
          cmds.xform(obj, ws=1, scalePivot = piv)

      I've written a few helper functions like this one that have been helping me understand the maya commands better. Something else that confused me for a while is the difference between, say cmds.scale(...) and cmds.setAttr(... +  '.scale'). I've tried running both of them, and from what I can tell they both do the same thing. I just haven't figured out circumstances under which each command is advantageous.

      Another thing I've realized is that there are MEL commands that aren't found in the online documentation at all. After a frustrating few hours, I found out from a forum that these are either run time commands, or procs that come with maya. To check, you can run whatIs , and Maya would either tell you it's a run time command, or give you the path to the file containing the proc. At first I was worried that I wouldn't able to use certain commands/procs in python, but the maya.mel.eval command saved the day.

      I'm almost done writing the function that adds columns to the base of the building. One problem I'm trying to fix right now is that the column-generation code relies on the subdivision of the footprint mesh, and my building-body mesh runs on the assumption that the footprint doesn't have any subdivisions. I'm planning on just making a copy of the subdivision-less footprint, adding subdivisions, and deleting it after the columns are generated. The only remaining problem is to make sure the columns are never intersecting with the building body, which I hope to solve by tomorrow. As I become more familiar with what I like to call "design patterns" for creating building assets, I hope to speed up my process and have images ready by the next update. Until then, stay tuned!

      Monday, November 14, 2011

      Some Change in Direction + Updates

      One of the comments that really stuck with me from the alpha review was why bother creating a building generation script so similar to City Engine, when City Engine already exists. I spent the weekend re-evaluating my project, and came up with some changes that I feel would set my project apart from most of the existing building generators.

      The majority of building/city scripts focus a lot on generating sufficient randomness, so the city doesn't look repetitive. Because of this, the user usually doesn't have a lot of say on what types of architecture should be generated at a particular location in the city (in CityEngine this is doable, but requires scripting on the user's end).

      I felt this would an interesting issue to address, so I decided to alter my project a bit, such that it focuses on generating a city with different building types, located according to user specifications. I started out identifying three basic types of architecture that exist in a typical city: business buildings, residential structures, and recreational areas, and listed some of their properties below.

       
      During one of my review sessions, Norm had suggested the use of a heat-map to specify the placement of different architectural styles. Using that as my start-off point, I plan on having my project take in an image from the user, with each component of the RGB value corresponding to a building type. For example, R = business, G = residential, B = recreational. For colors that have multiple values, I can determine the building type by the dominating RGB value, or by a probability function. This will allow my project to be extensible; additional building types can be added anytime as long as an RGB pattern is specified.

      Since Python has an excellent image processing library, I decided to continue my project in python from now on. Currently I'm in the middle of porting my code from MEL to python and thinking about setting up an inheritance structure (if any) for the different building files.

      Some links that were really helpful in getting me up to speed with python/maya was Chad Vernon's tutorial site and Autodesk's list of python commands in Maya. Check back in a couple days for more updates.

      Sunday, November 6, 2011

      Wrangling the Maya Plug-in Wizard

      This week I started exploring the Maya plug-in for Visual Studio. Since the whole process took a while to figure out, I thought I'd document the steps I took in case someone else needs it later. The basic set of instructions can be found on the autodesk site here, but additional steps are needed to make everything work (which I will mention below)

      1. The MayaPluginWizard.zip file is found in the devkit/plugin folder under wherever you installed Maya (for me it was C:\Program Files\Autodesk\Maya2012\devkit\pluginwizard). From there, open the MayaWizardReadme.txt, which will give you step by step instructions on adding the plugin wizard to VS (take note there are different instruction sets for 32 and 64 bits.
      2. Unzip the MayaPluginWizard.zip file (I had to copy this onto the desktop first due to permissions). After navigating into the extracted directory, open the MayaPluginWizard.vsz file in a text editor like Notepad++, and make sure Wizard=VsWizard.VsWizardEngine.9.0 refers to the correct version of Visual Studio (VS2008 is 9.0 so I didn't have to change anything).
      3. Copy the following files to the "C:\Program Files (x86)\Microsoft Visual Studio 9.0\VC\vcprojects" directory:
            MayaPluginWizard.vsdir
            MayaPluginWizard.vsz
            MayaPluginWizard.ico
      4. Copy the *outer* "MayaPluginWizard" directory to "C:\Program Files (x86)\Microsoft Visual Studio 9.0\VC\VCWizards".  NOTE: there should be a MayaPluginWizard directory within a MayaPluginWizard directory after this step.
      5. Now, since my version of Maya2012 is 64-bit, and VS is 32-bit, I needed to configure my VS for 64-bit applications. I followed the directions listed here (basically you need to install the missing x64 compiler and tools). This requires you to have the VS installer on hand, which was a pain. 
      6. Close VS if you have it open. Right click on the icon and select "Run as administrator". If you don't do this, you'll get an extremely vague popup saying "project upgrade failed". Figuring out this part was extremely frustrating.
      7. Now you should be able to create a project using the Maya Plugin Wizard. (Start Microsoft Visual Studio 9.0 and invoke File -> New -> Project -> Visual C++ Projects and select MayaPluginWizard.)
      8. The project will be created and then the solution can updated and built.

      Friday, November 4, 2011

      Alpha Review Thoughts

      After going through the comments on the Alpha Review, I've noted a few areas I could improve on, such as going into more detail on my project context as well as overall progress. The comments were helpful in giving me advice for resources as well as directions to consider for the project. Next I'll address some of the major points in the comments.

      Will the final project be procedural generation of a city or just buildings?
      This is something I've been thinking about since a few weeks ago. There are two parts to procedurally generating a city: the generation of the building itself, and then the creation of a city by populating city blocks with buildings. While I originally intended to focus on generating the building model, it's something that has been explored many times already, and I think it'd be more interesting to explore different ways the user can interface with Maya to generate a city.  Norm suggested I could have my script import a color-map from the user to determine which types of buildings should be generated in each region of a city. I feel this is a good point to start off on once I finish implementing the functionality to generate a basic building.

      How is this different from CityEngine and how does the user benefit from using a plug-in in Maya?
      At the moment, most of CityEngine's building generation is done through user-created files. I think it'd be neat if my script can offer a more visual approach like the one I mentioned earlier. Right now I have a couple ideas I'm planning on trying out next week. Until then, thanks for looking!

      Sunday, October 30, 2011

      Alpha Review


      Jump to see my current code

      Thursday, October 20, 2011

      Shaping Up the GUI

      TO DO:
      Have a GUI that creates a very basic building according to user specifications [3/6]


      IN PROCESS:
      Fine tune details for implementation [1/6]


      COMPLETED:
      Set up SVN [0/1]
      Research dis/advantages of using Python vs. C++  API's for Maya [0/3]
      Experiment with MEL UI creation [0/3]
      Read about Maya Nodes[0/5]
      Read about Maya C++ API, MEL Scripting [0/10]
      Build basic plug-in for Maya in MEL[0/4]
      Set up framework [0/5]

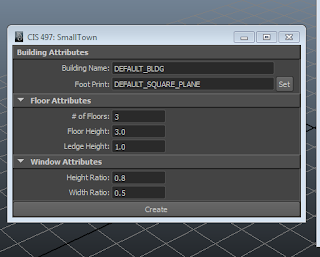
      While looking through tutorials on making MEL GUI's, I came across this page that introduced groups of controls, such as intFieldGroup. Previously I had been trying to create my GUI with individual text labels, fields, and buttons, but this simplified the process a lot. Right now I have a GUI with frame and column layouts. I also figured out how to extract the user input as a button command, so my next step is to finish creating the geometry from these inputs.

      The name is a placeholder for now...
      For now, I plan on limiting the generation of the building to just user interaction with the GUI. Once I complete all the functionality listed in the current GUI, I'll start incorporating dynamic resizing. From this tutorial,  the process seems like it will have to incorporate scriptJobs. I haven't looked very closely at this section yet, but plan on reading more about it in the future.

      A small problem I hadn't foreseen is global variables in MEL.  I initially had a global proc that extracts all the user inputs from the GUI and dumps them into variables, since it's easier to keep track of what's what (see below):

      // Retrieves all values from the GUI and assigns them to variables
      global proc retrieveGUIValues(){
          //building attributes
          $buildingName = `textFieldGrp -q -tx Building_Name`;
          $footprintName = `textFieldButtonGrp -q -tx FootPrint_Name`;
         
          //floor attributes
          $numFloors = `intFieldGrp -q -v1 NumFloors`;
          $floorHeight =`floatFieldGrp -q -v1 FloorHeight`;
          $ledgeHeight = `floatFieldGrp -q -v1 LedgeHeight`;
         
          //window attributes
          $windowHeightRatio = `floatFieldGrp -q -v1 WindowHeightRatio`;
          $windowWidthRatio = `floatFieldGrp -q -v1 WindowWidthRatio`;
         
          //check
          print ("creating building named " + $buildingName + " with " + $numFloors + " floors! LOL Just Kidding! \n");
      }
       However, I soon realized that these variables are out of the scope of all the other procs, and I need to specify them as global to rectify this. Using global variables requires an additional step of declaring it within each proc, which in the end isn't much cleaner than just re-extracting the user input whenever I need it, so off to the recycle bin this goes.

      Sunday, October 9, 2011

      Another Update

      TO DO:
      Build basic plug-in for Maya in MEL[1/4]

      IN PROCESS:
      Fine tune details for implementation [2/6]
      Set up framework [2/5]


      COMPLETED:
      Set up SVN [0/1]
      Research dis/advantages of using Python vs. C++  API's for Maya [0/3]
      Experiment with MEL UI creation [0/3]
      Read about Maya Nodes[0/5]
      Read about Maya C++ API, MEL Scripting [0/10]  

      Kind of a short update for this week. I've finished reading the first 3 chapters of Complete Maya Programming, which covers the Maya Dependency Graph and MEL scripting. Right now I'm trying to create a simple GUI that lets users extrude the body of a building from a custom "footprint". At the moment I'm having some trouble with executing commands when the user interacts with the GUI, but hopefully that will be fixed shortly. I will have another update when that's done.

      Thanks for looking and have a great fall break!

      Thursday, September 29, 2011

      Starting Out, Logistics, and More

      Tasks from my initial game plan and some for next week:

      Note: Numbers in [ ] are estimated time left / projected hours needed

      TO DO:
      Build basic plug-in for Maya in MEL[4/4]
      Read about Maya Nodes[5/5]

      IN PROCESS:
      Read about Maya C++ API, MEL Scripting [8/10] 
      Fine tune details for implementation [5/6]
      Set up framework [4/5]
      Experiment with MEL UI creation [2/3]

      COMPLETED:
      Set up SVN [0/1]
      Research dis/advantages of using Python vs. C++  API's for Maya [0/3]

      I spent part of this week reading about the two main API's available for writing tools for Maya, namely Python and C++. From what I gathered online, most users agreed that python was an ideal entry point for learning to program for Maya because of its intuitive syntax. However, it's not as well documented online as its C++ counterpart. After talking with Joe and some friends with more expertise in the area, it seemed that C++ is more ideal for this project, since it offers more control and functionality (ie. creating custom nodes in Maya). I also found an article on interfacing between the two API's if the need ever arises.

      I've also started to explore creating MEL user interfaces. I'm working through the examples on this site right now, so far everything's been easy to follow, and it's encouraging to have even a little bit of visual feedback.

      Test window generated from the tutorial

      For the next week, I'm planning on reading more about the Maya Dependency Graph and creating nodes.

      Finally, here's the preliminary system diagram for my building generator:


      I'm planning on emailing a few people this week to make sure that this is a reasonable approach, so the chart is subject to change depending on how the feedback turns out.

      Also, Gliffy (the chart generator) is pretty amazing (thanks Marley!)

      Friday, September 23, 2011

      An Updated Approach

      This week I rewrote some parts of my original design document, and I've up with a more detailed approach for my project. After talking to people who have implemented similar projects, the general advice I gathered was that it was best to ensure basic functionality first, before trying to implement all the details of a paper.

      My major goal last week was to read through all the papers and find one that is most relative to my project. Vijay, who worked on the Building Building Builder project from a previous year, recommended Interactive Visual Editing of Grammars for Procedural Architecture, so I've decided to focus on this paper after I've created the tool with some basic functionalities.

      As for the work flow, my plan for next week is to finish reading about scripting for and have a basic plug-in running that can create a cube and apply basic transformations (namely scale and rotation). The next step after that would be to add additional faces and edges onto the cube.

      I'm really looking forward to next week and having a skeleton up and running. Thoughts and suggestions are much appreciated!

      Wednesday, September 14, 2011

      Game Plan

      Things to check off for next week:
      • Finish background reading
      • Read about Maya C++ API, MEL Scripting
      • Iron out details for implementation
      • Start setting up the framework
      • Set up SVN

      And So It Begins...

      Procedural Generation of Urban Environments: the Abstract

      With the advent of modern movies and video games, the demand for visually stimulating environments comprised of unique components has been ever increasing. Traditionally, the problem has been solved by simply creating more assets. However, given the time and effort necessary to create 3D models, a producer risks spending a lot of resources on what is ultimately a small part of the final product. Consequently, this solution becomes much less feasible.
      An alternative to manually creating individual components is procedural generation. The result is a large number of variable 3D assets generated in relatively a short amount of time compared to the traditional method. This project will focus on the procedural generation of buildings in an urban environment. Users will be able to create procedurally generated buildings via a Maya authoring tool plug-in. The ultimate goal is for users to create urban environments without the need to model each structure individually.