Monday, November 14, 2011

Some Change in Direction + Updates

One of the comments that really stuck with me from the alpha review was why bother creating a building generation script so similar to City Engine, when City Engine already exists. I spent the weekend re-evaluating my project, and came up with some changes that I feel would set my project apart from most of the existing building generators.

The majority of building/city scripts focus a lot on generating sufficient randomness, so the city doesn't look repetitive. Because of this, the user usually doesn't have a lot of say on what types of architecture should be generated at a particular location in the city (in CityEngine this is doable, but requires scripting on the user's end).

I felt this would an interesting issue to address, so I decided to alter my project a bit, such that it focuses on generating a city with different building types, located according to user specifications. I started out identifying three basic types of architecture that exist in a typical city: business buildings, residential structures, and recreational areas, and listed some of their properties below.

 
During one of my review sessions, Norm had suggested the use of a heat-map to specify the placement of different architectural styles. Using that as my start-off point, I plan on having my project take in an image from the user, with each component of the RGB value corresponding to a building type. For example, R = business, G = residential, B = recreational. For colors that have multiple values, I can determine the building type by the dominating RGB value, or by a probability function. This will allow my project to be extensible; additional building types can be added anytime as long as an RGB pattern is specified.

Since Python has an excellent image processing library, I decided to continue my project in python from now on. Currently I'm in the middle of porting my code from MEL to python and thinking about setting up an inheritance structure (if any) for the different building files.

Some links that were really helpful in getting me up to speed with python/maya was Chad Vernon's tutorial site and Autodesk's list of python commands in Maya. Check back in a couple days for more updates.

Sunday, November 6, 2011

Wrangling the Maya Plug-in Wizard

This week I started exploring the Maya plug-in for Visual Studio. Since the whole process took a while to figure out, I thought I'd document the steps I took in case someone else needs it later. The basic set of instructions can be found on the autodesk site here, but additional steps are needed to make everything work (which I will mention below)

  1. The MayaPluginWizard.zip file is found in the devkit/plugin folder under wherever you installed Maya (for me it was C:\Program Files\Autodesk\Maya2012\devkit\pluginwizard). From there, open the MayaWizardReadme.txt, which will give you step by step instructions on adding the plugin wizard to VS (take note there are different instruction sets for 32 and 64 bits.
  2. Unzip the MayaPluginWizard.zip file (I had to copy this onto the desktop first due to permissions). After navigating into the extracted directory, open the MayaPluginWizard.vsz file in a text editor like Notepad++, and make sure Wizard=VsWizard.VsWizardEngine.9.0 refers to the correct version of Visual Studio (VS2008 is 9.0 so I didn't have to change anything).
  3. Copy the following files to the "C:\Program Files (x86)\Microsoft Visual Studio 9.0\VC\vcprojects" directory:
        MayaPluginWizard.vsdir
        MayaPluginWizard.vsz
        MayaPluginWizard.ico
  4. Copy the *outer* "MayaPluginWizard" directory to "C:\Program Files (x86)\Microsoft Visual Studio 9.0\VC\VCWizards".  NOTE: there should be a MayaPluginWizard directory within a MayaPluginWizard directory after this step.
  5. Now, since my version of Maya2012 is 64-bit, and VS is 32-bit, I needed to configure my VS for 64-bit applications. I followed the directions listed here (basically you need to install the missing x64 compiler and tools). This requires you to have the VS installer on hand, which was a pain. 
  6. Close VS if you have it open. Right click on the icon and select "Run as administrator". If you don't do this, you'll get an extremely vague popup saying "project upgrade failed". Figuring out this part was extremely frustrating.
  7. Now you should be able to create a project using the Maya Plugin Wizard. (Start Microsoft Visual Studio 9.0 and invoke File -> New -> Project -> Visual C++ Projects and select MayaPluginWizard.)
  8. The project will be created and then the solution can updated and built.

Friday, November 4, 2011

Alpha Review Thoughts

After going through the comments on the Alpha Review, I've noted a few areas I could improve on, such as going into more detail on my project context as well as overall progress. The comments were helpful in giving me advice for resources as well as directions to consider for the project. Next I'll address some of the major points in the comments.

Will the final project be procedural generation of a city or just buildings?
This is something I've been thinking about since a few weeks ago. There are two parts to procedurally generating a city: the generation of the building itself, and then the creation of a city by populating city blocks with buildings. While I originally intended to focus on generating the building model, it's something that has been explored many times already, and I think it'd be more interesting to explore different ways the user can interface with Maya to generate a city.  Norm suggested I could have my script import a color-map from the user to determine which types of buildings should be generated in each region of a city. I feel this is a good point to start off on once I finish implementing the functionality to generate a basic building.

How is this different from CityEngine and how does the user benefit from using a plug-in in Maya?
At the moment, most of CityEngine's building generation is done through user-created files. I think it'd be neat if my script can offer a more visual approach like the one I mentioned earlier. Right now I have a couple ideas I'm planning on trying out next week. Until then, thanks for looking!

Sunday, October 30, 2011

Alpha Review


Jump to see my current code

Thursday, October 20, 2011

Shaping Up the GUI

TO DO:
Have a GUI that creates a very basic building according to user specifications [3/6]


IN PROCESS:
Fine tune details for implementation [1/6]


COMPLETED:
Set up SVN [0/1]
Research dis/advantages of using Python vs. C++  API's for Maya [0/3]
Experiment with MEL UI creation [0/3]
Read about Maya Nodes[0/5]
Read about Maya C++ API, MEL Scripting [0/10]
Build basic plug-in for Maya in MEL[0/4]
Set up framework [0/5]

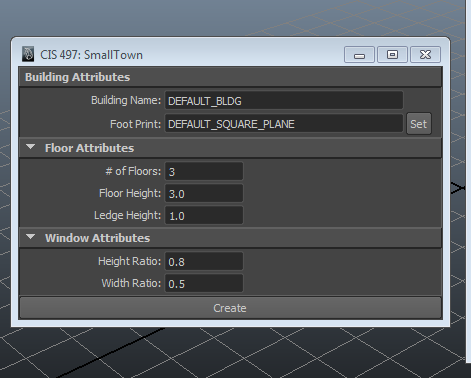
While looking through tutorials on making MEL GUI's, I came across this page that introduced groups of controls, such as intFieldGroup. Previously I had been trying to create my GUI with individual text labels, fields, and buttons, but this simplified the process a lot. Right now I have a GUI with frame and column layouts. I also figured out how to extract the user input as a button command, so my next step is to finish creating the geometry from these inputs.

The name is a placeholder for now...
For now, I plan on limiting the generation of the building to just user interaction with the GUI. Once I complete all the functionality listed in the current GUI, I'll start incorporating dynamic resizing. From this tutorial,  the process seems like it will have to incorporate scriptJobs. I haven't looked very closely at this section yet, but plan on reading more about it in the future.

A small problem I hadn't foreseen is global variables in MEL.  I initially had a global proc that extracts all the user inputs from the GUI and dumps them into variables, since it's easier to keep track of what's what (see below):

// Retrieves all values from the GUI and assigns them to variables
global proc retrieveGUIValues(){
    //building attributes
    $buildingName = `textFieldGrp -q -tx Building_Name`;
    $footprintName = `textFieldButtonGrp -q -tx FootPrint_Name`;
   
    //floor attributes
    $numFloors = `intFieldGrp -q -v1 NumFloors`;
    $floorHeight =`floatFieldGrp -q -v1 FloorHeight`;
    $ledgeHeight = `floatFieldGrp -q -v1 LedgeHeight`;
   
    //window attributes
    $windowHeightRatio = `floatFieldGrp -q -v1 WindowHeightRatio`;
    $windowWidthRatio = `floatFieldGrp -q -v1 WindowWidthRatio`;
   
    //check
    print ("creating building named " + $buildingName + " with " + $numFloors + " floors! LOL Just Kidding! \n");
}
 However, I soon realized that these variables are out of the scope of all the other procs, and I need to specify them as global to rectify this. Using global variables requires an additional step of declaring it within each proc, which in the end isn't much cleaner than just re-extracting the user input whenever I need it, so off to the recycle bin this goes.

Sunday, October 9, 2011

Another Update

TO DO:
Build basic plug-in for Maya in MEL[1/4]

IN PROCESS:
Fine tune details for implementation [2/6]
Set up framework [2/5]


COMPLETED:
Set up SVN [0/1]
Research dis/advantages of using Python vs. C++  API's for Maya [0/3]
Experiment with MEL UI creation [0/3]
Read about Maya Nodes[0/5]
Read about Maya C++ API, MEL Scripting [0/10]  

Kind of a short update for this week. I've finished reading the first 3 chapters of Complete Maya Programming, which covers the Maya Dependency Graph and MEL scripting. Right now I'm trying to create a simple GUI that lets users extrude the body of a building from a custom "footprint". At the moment I'm having some trouble with executing commands when the user interacts with the GUI, but hopefully that will be fixed shortly. I will have another update when that's done.

Thanks for looking and have a great fall break!

Thursday, September 29, 2011

Starting Out, Logistics, and More

Tasks from my initial game plan and some for next week:

Note: Numbers in [ ] are estimated time left / projected hours needed

TO DO:
Build basic plug-in for Maya in MEL[4/4]
Read about Maya Nodes[5/5]

IN PROCESS:
Read about Maya C++ API, MEL Scripting [8/10] 
Fine tune details for implementation [5/6]
Set up framework [4/5]
Experiment with MEL UI creation [2/3]

COMPLETED:
Set up SVN [0/1]
Research dis/advantages of using Python vs. C++  API's for Maya [0/3]

I spent part of this week reading about the two main API's available for writing tools for Maya, namely Python and C++. From what I gathered online, most users agreed that python was an ideal entry point for learning to program for Maya because of its intuitive syntax. However, it's not as well documented online as its C++ counterpart. After talking with Joe and some friends with more expertise in the area, it seemed that C++ is more ideal for this project, since it offers more control and functionality (ie. creating custom nodes in Maya). I also found an article on interfacing between the two API's if the need ever arises.

I've also started to explore creating MEL user interfaces. I'm working through the examples on this site right now, so far everything's been easy to follow, and it's encouraging to have even a little bit of visual feedback.

Test window generated from the tutorial

For the next week, I'm planning on reading more about the Maya Dependency Graph and creating nodes.

Finally, here's the preliminary system diagram for my building generator:


I'm planning on emailing a few people this week to make sure that this is a reasonable approach, so the chart is subject to change depending on how the feedback turns out.

Also, Gliffy (the chart generator) is pretty amazing (thanks Marley!)